Back in the Autumn I made a couple of varieties of chutney as Christmas gifts. Spiced Marrow Chutney and a Tangy Beetroot Chutney using a combination of recipe ideas from this brilliant site. They've been "maturing" since October so should be perfect for the Christmas table by now. The only thing left to do was make them look all Christmassy and add a little personal touch to them; so I opted for some hand embroidered jam pot covers tied with grosgrain ribbon....(I actually had about 12 jars in total but some had already been gifted before I had a chance to take these photos!)
I got all OCD on getting the right size circle for my covers. Just didn't like the idea of cutting a square and trimming it to size once in place. I just KNEW I would screw it up that way. So if anyone else is as mildly obsessive about these things as me here's my method...
I had several sizes of jar so just repeated the process for each different size. Firstly draw round the the lid of the jar on a sheet of paper...
Then find the centre point of the circle by folding it in half lengthwise then across the width. It's actually the circle itself that needs to be folded in half so I held the paper up to the light as I was folding so as to see through it and line the edges of the circle up as I was folding...
Measure the diameter of the circle, let's say this one was 3". Then mark a point the exact same distance, 3", from the centre point, extending out beyond your original circle, on each of the four fold lines...
Then find a plate/bowl/object (or use a compass if you want to be super precise!) and use it to draw a circle that encompasses these four points equally(ish)...
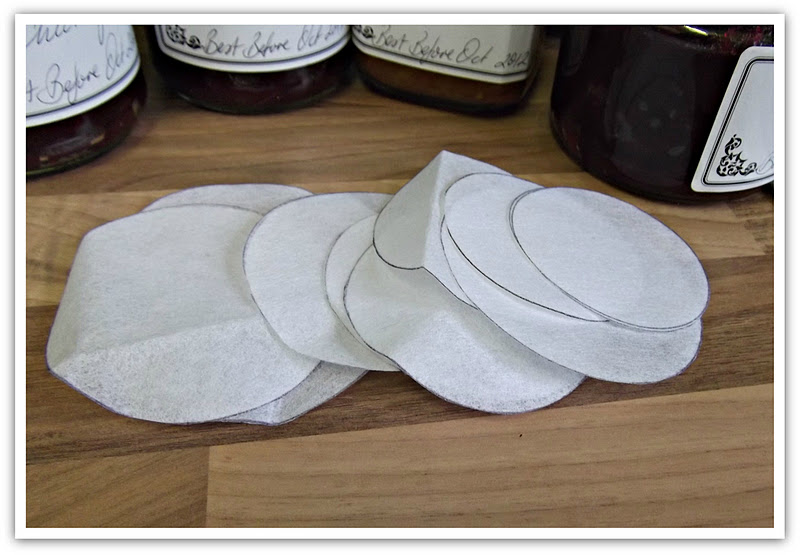
Et voila...Cut out your template(s)....
Because I planned to emroider my covers I cut out heavy weight iron on interfacing the exact same size as my jar lids....
And some squares of fabric (thrifted and upcycled of course!) slightly larger than my templates.....
Place fabric square RS down on the ironing board. Centre the interfacing sticky side down on top of the fabric and press to adhere. Then pin the template on top of this making sure the centre circle of the template lines up with the circle of interfacing....
Cut around the template with pinking shears...
It should look like this...
I then embroidered snowflakes on each cover with embroidery floss. These are a combination of French Knots, Lazy Daisy Stitch, and Back Stitch and took about 15 mins each to do so great as a last minute personal touch...
Secure the covers to the jar tops with elastic bands then tie with ribbon......
There are so many ideas out there for "Gifts in a Jar" and these would add a nice finishing touch to anything in a jar. Not just chutneys :)
Px
Showing posts with label fabric. Show all posts
Tuesday, December 20, 2011
Thursday, November 17, 2011
Wheat & Lavender Heat Pack
Based on this pattern, I've made a heat therapy pack for my Mum, using denim and fabric scraps to make the cover, which closes with velcro. Inside I have used calico material for the lavender and wheat pillow. All fabric used, including calico, is from my op shop stash. I used thrifted lace and a recycled birthday card to write a message.

Heat packs are microwaved for approximately 2 minutes, they small divine and feel great on the back of shoulders.
Unfortunately, what I probably should have considered, is sending such a weight to the UK; $40! Ouch.
Heat packs are microwaved for approximately 2 minutes, they small divine and feel great on the back of shoulders.
Unfortunately, what I probably should have considered, is sending such a weight to the UK; $40! Ouch.
Sunday, November 6, 2011
Miscellany table runner pinned and ready to quilt
I finished the top of my Miscellany table runner and it's pinned and ready for quilting. Which I hope to find the time for tomorrow. We're a week away from flying home so that's plenty of time to get this done. Right?
If you'd like to see the progress, here are some snaps!


This has been such a fun process. I geekily love the math involved with getting everything to fit the way I want it and if I make a mistake, I just add another piece of fabric. See what I mean?

I LOVE the way it is looking so far and can't wait for it to be covered in yummy Thanksgiving food!

Monday, October 24, 2011
Miscellany table runner update!
Hi everyone! I wanted to share an update on the table runner I'm making for my mum for Christmas (but giving to her at Thanksgiving). I put in a lot of time over the weekend on these improvisational blocks.
Here's a look at the blocks laid out and numbered. Our table is a unique size because my dad made it years and years ago, so it's going to be a bit wider than the Purl Bee version I'm using as inspiration.

I've never pieced like this and it's so much fun. I started building the blocks by cutting strips and then it became a game to see how I could use up scraps. After I lined up what I had I did a lot of math to see what I needed to do to get to the finished size I wanted and added to some of them as needed. I decided to put a border around each of them because I felt the combination of scrappy piecing and the eclectic collection of prints needed some consistency.
Here are a couple of blocks up close. Taking these gave me a chance to use our new tripod!


I just love this fabric collection!
Wednesday, December 15, 2010
Perfect Gifts for Fellow Sewists (inc Tutorial)
Today was my last day at college until the new year. I wanted to give my fellow dressmakers a little something. Some time ago, I'd stumbled upon this tutorial on Martha Stewart's fabulous site, and decided they'd be perfect. And they were. Cute AND quick.
I used some of the fabric left from my Christmas aprons, as it's such a pretty floral. I made up the pincushions as per the tutorial, substituting the "leaves" in Martha's version, for pretty vintage buttons on mine, top and bottom. I secured the buttons with the embroidery floss, wrapping the loose end around the thread shank and tucking it undeneath the button to finish it.
I wrapped them in some polka dot cellophane (from my local florist) tied with a white ribbon. If I do say so myself, they looked soooo cute. All done in one evening, whilst relaxing in front of the TV with a glass of Rioja! Thanks Martha! I rather fancy making a giant one of these for myself.....
Happy Christmas all, With Love & Best Wishes, Portia.xxx (Miss P)
I used some of the fabric left from my Christmas aprons, as it's such a pretty floral. I made up the pincushions as per the tutorial, substituting the "leaves" in Martha's version, for pretty vintage buttons on mine, top and bottom. I secured the buttons with the embroidery floss, wrapping the loose end around the thread shank and tucking it undeneath the button to finish it.
I wrapped them in some polka dot cellophane (from my local florist) tied with a white ribbon. If I do say so myself, they looked soooo cute. All done in one evening, whilst relaxing in front of the TV with a glass of Rioja! Thanks Martha! I rather fancy making a giant one of these for myself.....
Happy Christmas all, With Love & Best Wishes, Portia.xxx (Miss P)
Labels:
accessories,
Christmas,
christmas gift,
Christmas tree decorations,
crafting,
cushion,
diy,
dressmaking,
fabric,
homemade,
Martha Stewart,
recycle,
sewing,
tutorial,
tutorials,
wrapping
Friday, November 12, 2010
Introduction and Liberty bracelet
Hello fellow crafters, I'm Cecili from Sewing and so on. Thanks Tilly for letting me join this awesome club, I've had a look at the members' ideas for Christmas gifts and there are so many great things to be inspired by!
I'm planning to give all my relatives handmade presents this year, I'll make a vintage shirt for my boyfriend and I'll probably focus on accessories for the girls, bags, pouches, hair ornaments, jewelry... Actually I've just finished a Liberty bracelet that turned out quite nice -well, you're rarely wrong when you use these wonderful fabrics^^- so here's the tutorial in case you'd want to make one too.
You'll need fabric, a pair of choker clasps, a lobster clasp, a few links, pliers and glue.

First measure around your wrist to find the size you want for your fabric strip, mine was 14cm (5.4").
To determine the final size of your fabric strip you also need to measure the width of your choker clasps, mine were 1.6cm (3/4") and since you'll fold the fabric in two you must double this number (here 3.2cm / 1.3").
You need a 1cm seam allowance on both lengths but not on the ends since they will be encased in the clasps!
So the final strip for my bracelet was 14cm x 5.2cm (5.4" x 2").
I fused a thin strip of interfacing on each end to make them stronger since they will be perforated by the clasps' teeth.

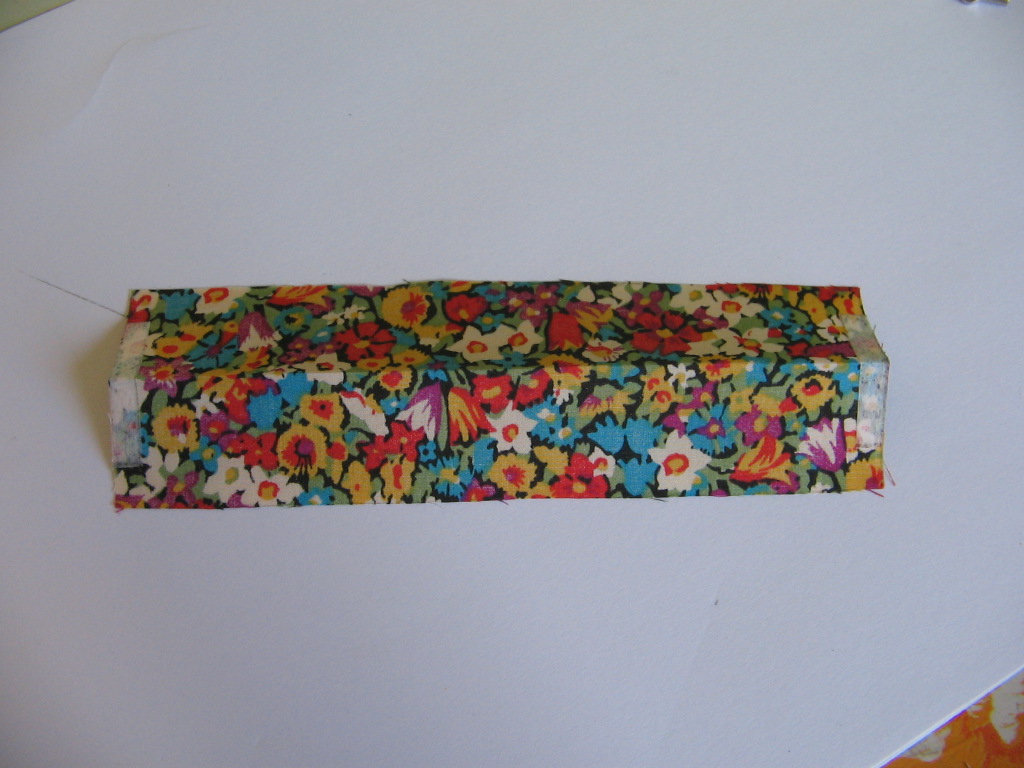
Fold your fabric strip in two with right sides together and sew.

Turn the fabric tube inside out and iron it flat. I've cut a strip of cardboard the same width as my fabric tube and slid it into the tube to help flatten it while ironing.

Put a little glue in the choker clasps, insert the strip's ends and close the clasps pressing them with pliers. Let the glue dry then add a lobster clasp to one end and a few links to the other.


Et voilĂ ! You're done :) Later I added a tiny blue flower bead to the end on the chain to give the bracelet extra cuteness. I hope you enjoyed this tutorial, if you have any questions or suggestions to improve it please tell me!
I'm planning to give all my relatives handmade presents this year, I'll make a vintage shirt for my boyfriend and I'll probably focus on accessories for the girls, bags, pouches, hair ornaments, jewelry... Actually I've just finished a Liberty bracelet that turned out quite nice -well, you're rarely wrong when you use these wonderful fabrics^^- so here's the tutorial in case you'd want to make one too.
You'll need fabric, a pair of choker clasps, a lobster clasp, a few links, pliers and glue.
First measure around your wrist to find the size you want for your fabric strip, mine was 14cm (5.4").
To determine the final size of your fabric strip you also need to measure the width of your choker clasps, mine were 1.6cm (3/4") and since you'll fold the fabric in two you must double this number (here 3.2cm / 1.3").
You need a 1cm seam allowance on both lengths but not on the ends since they will be encased in the clasps!
So the final strip for my bracelet was 14cm x 5.2cm (5.4" x 2").
I fused a thin strip of interfacing on each end to make them stronger since they will be perforated by the clasps' teeth.
Fold your fabric strip in two with right sides together and sew.
Turn the fabric tube inside out and iron it flat. I've cut a strip of cardboard the same width as my fabric tube and slid it into the tube to help flatten it while ironing.
Put a little glue in the choker clasps, insert the strip's ends and close the clasps pressing them with pliers. Let the glue dry then add a lobster clasp to one end and a few links to the other.
Et voilĂ ! You're done :) Later I added a tiny blue flower bead to the end on the chain to give the bracelet extra cuteness. I hope you enjoyed this tutorial, if you have any questions or suggestions to improve it please tell me!
Wednesday, November 10, 2010
Big list this year, time to get cracking!
Hello everyone, my name is Kath and I live in Brisbane, Australia. I have far too many hobbies to list but my most recent endeavour has been my Etsy store bunnyhornet. I make vintage inspired jewellery there and I'll be adding a bit of that to my Christmas pressies list!
BUT!! My projects I have to tackle this year are:
1. 3 x personalised cushion covers for my nephews.
2. 3 x reversible tote bags
3. Skirt for my sister-in-law
4. Sundress for another sister-in-law
5. A few simple make-up cases
6. Flying pigs mobile (idea found on this blog!)
7. Some little bunnies (also idea found on this blog - thanks!)
8. Tuxedo bib for littlest nephew
9. 2 x capes for bigger nephews
10. 3 x aprons for sisters and mother-in-law
11. Giraffe Toy
OMG! How am I ever going to finish? I don't have a blog of my own so I'll document my sources for inspiration etc here :)
1. Personalised Pillows
My sister-in-law sent me a link for this:
If you click on the picture it will take you to the webiste.
She wanted her own version for her new baby and I have two other little nephews so I've bought fabric for all three and some felt for the names.
I bought my fabrics from Superbuzzy who has some amazing prints and colours.
And the felt came from Etsy user litlbrownbird.
And this is the inspiration for colour scheme I'm working with!
How cute is he!
The fabric picked for Boy 1 is to go with this little fella and I think the oranges and blues will go nicely with his room....
I want to make one similar but that's only in the 'musing' stages at the moment, no concrete plans!
You'll also notice I've bought the fabrics for the 3 reversible totes. The pattern I'll be using is from Burda Style and is free!
Love this tutorial over at Chezlin!
BUT!! My projects I have to tackle this year are:
1. 3 x personalised cushion covers for my nephews.
2. 3 x reversible tote bags
3. Skirt for my sister-in-law
4. Sundress for another sister-in-law
5. A few simple make-up cases
6. Flying pigs mobile (idea found on this blog!)
7. Some little bunnies (also idea found on this blog - thanks!)
8. Tuxedo bib for littlest nephew
9. 2 x capes for bigger nephews
10. 3 x aprons for sisters and mother-in-law
11. Giraffe Toy
OMG! How am I ever going to finish? I don't have a blog of my own so I'll document my sources for inspiration etc here :)
1. Personalised Pillows
My sister-in-law sent me a link for this:
If you click on the picture it will take you to the webiste.
She wanted her own version for her new baby and I have two other little nephews so I've bought fabric for all three and some felt for the names.
I bought my fabrics from Superbuzzy who has some amazing prints and colours.
And the felt came from Etsy user litlbrownbird.
And this is the inspiration for colour scheme I'm working with!
How cute is he!
The fabric picked for Boy 1 is to go with this little fella and I think the oranges and blues will go nicely with his room....
I want to make one similar but that's only in the 'musing' stages at the moment, no concrete plans!
You'll also notice I've bought the fabrics for the 3 reversible totes. The pattern I'll be using is from Burda Style and is free!
Now this tuxedo bib pattern is meant to be for an adult (to look like you're wearing a tux shirt) but how cute would a version be for a baby? Argh! So cute! Another Freebie!
I'll also use some of the leftover fabric for the make-up cases. I'll just make these really simple pouches with a zip closure.
Love this tutorial over at Chezlin!
I also bought some of that felt to make brown bunnies like the ones shown on the blog and on the original website of Betz White.
The flying piggy mobile I found on this blog here. I've already started on my own pattern - don't want to mess with copyright but as it's for a gift we should be ok! The skin tone and white felt I've bought from litlebrownbird will be for this one.
Ok, and that's where I'm up to with my ideas so far..... wheeeeeeeeee!
Now to find good patterns for the Sundress, the Skirt, the aprons and the capes. Any ideas?
Labels:
children,
clothing,
fabric,
introduction,
lavender bags,
purses,
sewing,
stuffies,
toys
Tuesday, November 2, 2010
Party dress present
Hoorah, I've made my first Christmas present! It's a twirly whirly party dress for my three-year-old niece Hannah and although it's not a secret present (she knows about it and chose the fabric) it is made from scratch by me so I thought I'd share it here.
This was my first attempt at making children’s clothes from a pattern (I used New Look 6881) and the whole process was a pleasure from start to finish (see my blog). If you've got a few dressmaking skills, then a handmade piece of clothing for a little girl is a good idea for a present. It's completely unique and was actually pretty cheap to make because you need so little fabric. It cost £3.50 a metre for the flowery fabric and £1.50 a metre for the lining fabric, even the zip was half price! I can't WAIT to see photos of her wearing it at Christmas!
The whole making your own presents business is definitely good for the soul. Every time I look at that cute little dress I get a big smile on my face. x
Subscribe to:
Posts (Atom)