Monday, October 31, 2011

I've got a plan!

Hello Crafty Christmas Crafters! I’m Andrea and I blog over at Stitch Parade. I’m a bit late to the party but this past weekend I finally cleared a couple of UFOs from my sewing table and I’m now ready to get stated with my Christmas presents.

Here’s what I’m hoping to accomplished before December 25th:

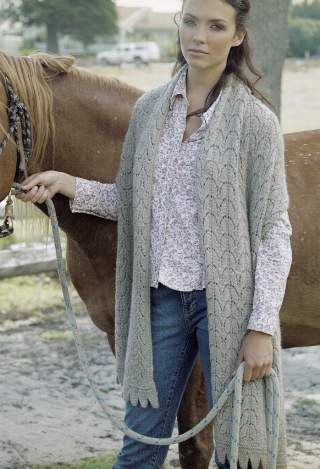
1. A scarf for my Dad following the Extra Warm Men’s Scarf pattern by Cotton and Cloud. The fabric texture in this free Ravelry pattern is super nice and I hope my dad will like it.

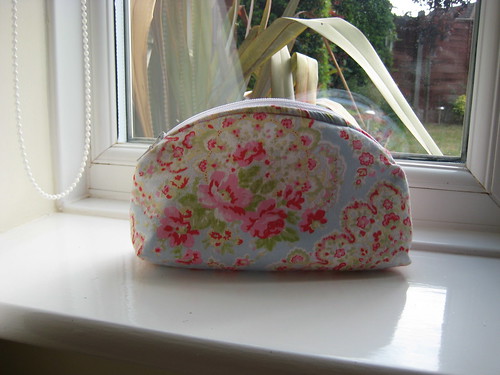
2. For my step-mom I will be making a leather clutch just like this one I made this past summer (shown below), only this time I'll use a buttery cream colour.

3. I’ve been working on this quilt for a while. It’s been sandwiched and pin basted and if I get my act together and actually quilt and bind it, it will make a nice Christmas present for my mother-in-law. 4. Both my step-daughter and sister-in-law will be receiving wristlets this Christmas. I’m undecided on the pattern so if any of you have any suggestions, please let me know.

5. My little sister lives in South America where Christmas lands right smack in the middle of summer. She’ll be visiting me in Toronto this holiday season and I’m planning on sending her back home with a fabulously extra large tote bag in bright prints that she can take to the beach.

6. For my baby nephew I will be making a pair of baby pants, a hat and a larger size of the same pair of reversible baby shoes I made for him a few months ago. This time I’m using a print with tiny robots. The pattern can be purchased from this etsy shop.

7. Last but not least, I’m planning on making sewn mittens for my friends’ kids. I found this great free pattern for fully lined mitts here. They look faster to make than knitted mittens and I have a couple of fun fabric choices that will wok for these little boys. Note that the pattern comes in multiple sizes, including adults, so these would be suitable for many people on your lists. And, they get bonus points as a stash busting project.

Now that I look back at my list, I’m getting scared that I won’t finish everything – It’s November already! Better get crafting…

Upcycling a Wall Calendar into a Monthly Planner

Hey everyone - I'm Karen from Renegade Homestead, checking in again.  In my first post, I listed all the presents I'm planning for my friends and family this Christmas.  Amongst my ideas were several books and journals that I'd like to make instead of buy.  Just one minor set-back:  I've never made a book before.  I decided to do a test run by converting one of the million 2012 calendars that charities send out at this time of year into a hardcover monthly planner.  Here's how I did it:  

Materials:
Wall calendar
Scissors
Glue stick
Corrugated cardboard
Water activated paper packaging tape
Clear packaging tape

1) Start by cutting up a wall calendar into individual pages.


2) Fold each page in half so that the calendar part is on the inside and the picture is on the outside.  Stack them in chronological order.  


3) Glue the back right side of each page to the back left side of the next one.  When you're done you should have something that looks like this:


4) Now it's time to start the cover.  Cut three pieces of cardboard: one for the spine that is 0.5" x 8.75" and two for the covers (each 5.5" x 8.75").  Fold paper packaging tape over the edges to finish them as shown below.


5) Put the three pieces of the cover together to form a triangle (see photo below).  While they're in this position, use a strip of clear packaging tape to connect them.  I centered the strip on the spine and pressed it down on either side.  It's important to do this step in this position to make sure the book opens and closes properly.   


6) Open the covers so that the side with the clear packaging tape is facing down.  Put a strip of paper packaging tape down the center of the spine to connect it again to the covers.  Before activating it with water, I made two creases in the tape where the covers would bend.  You can see the creases on either side of the spine in the photo below.


7) Time to add the pages that were put together earlier.  Glue the back left side of the January page to the front cover.  Open and close the book a few times to see where the back page should sit.  Once you've found a good spot, glue the back right side of the December page to the back cover.


8) I used an extra page that was left over from the wall calendar to pretty up the cover a bit.  Just make sure you glue it on while the book is closed.  


And done!  I'm glad I got this practice run in because I definitely see some room for improvement before I start on the real gifts - especially when it comes to tidying up the cover and improving the spine.  But for now, I'm happy to have saved another wall calendar from the recycling bin!

Little Hello + 100 Handmade Stocking Fillers

Hello everyone! I'm Adele from Something Quite Lovely. I'm soo excited to be involved in Crafty Christmas Club and seeing what you've all been making has made me eager to get going. Alas, essays stand in the way of me and lots of glittery, crafty things. However, I can brain storm! I really, really need some help with this one though. I've got a million presents to make on a student budget ... and did I mention this is my first completely handmade Christmas? It'll be fiiiine. I hope!

Here's my list of people:

- Mum
- Dad
- Grandpa
- Uncle
- Sisters (in their 30's) + husbands*
- Nephews (15, 13, 11 and 5)
- Nieces (13 (going on 23), 4 and 1 1/2)
- I want some gifts for my girl friends too but not sure what yet.

* I'm either gonna do just my sisters or a sort of joint gift thing for each couple.

I can: sew (hand/machine (novice)), crochet, embroider, cook/bake etc

Any ideas would be much appreciated (only simple machine sewing ones please!)

I've also put together a list of my favourite 100 Handmade Stocking Fillers:

Photobucket


Edible:

1. Oatmeal Cookie Mix
2. Snowman Soup
3. SQL Chocolate Brownies
4. Pancakes in a Jar
5. Homemade Caramel
6. Homemade Spice Rub
7. Nut Brittle Block
8. Personalised Coffee Blends
9. Homemade Irish Cream
10. DIY: Ice-cream Sundae Kit
11. Edible DNA
12. Peanut Butter Playdough
13. Homemade Cocktail Mixers
14. Homemade Cocktail Sugar
15. DIY Vanilla Extract
16. Texas Spice Rub
17. Easy Holiday Hot Chocolate
18. Hot Chocolate on a Stick
19. Homemade Fig Rolls
20. Chocolate Fudge

*For most of these recipes sterilised jars/bottles are required to minimise bacteria growth and prolong the life of the product. Some people boil their glass, but if you put your containers into the dishwasher on the hottest cycle and leave them in there until required, I find it works just as well. Don't forget: don't touch the inside of the glass with your bare hands after it's been sterilised or it's back in the dishwasher!*

Men:

21. Homemade Shaving Soap
22. Fabric Lanyard
23. iPad Case
24. Polaroid Magnets
25. Tool Roll
26. Tie
27. Crocheted Slippers
28. Paracord Bracelet/Watch Strap
29. iPod Cover
30. Crocheted Socks
31. Reinbeer (see what I did there?)
32. Tie Napkin
33. Monogrammed Cuff Links
34. Embossed Key Chain/Bookmark
35. Travel Organiser
36. BBQ Towel
37. Hobby/Travel Box Bag
38. ID Wallet
39. Monogram Mug
40. Domino Peppermint Creams (recipe link under pin)

Women:

41. Peppermint Cocoa
42. Adult Colouring Pages
43. Pretty Snood
44. Dry Erase Board
45. Coffee Mug Cozy
46. Cupcake Oven Mitt
47. Energy/Pampering/Refreshment in a Jar
48. (Unisex) Apron
49. Lemon Exfoliating Bath Salt
50. Triangle Coin Purse
51. Dish Towel Belt
52. Face Scrubbie
53. Paint brush/Pencil roll
54. Lip Balm
55. Jewelled Bookmark
56. Custom Lunch Tote
57. Glasses Case
58. Lace Cuff Bracelet
59. Doily Bowl
60. Washi Tape Magnets

Kids and Teens:

61. Anthropologie Knock-Off Bobby Pins
62. Personalised Button Canvas
63. Felt Earring Book
64. Lego Crayons
65. Re-Con Girly Dress
66. Charger Wall Pocket
67. DIY Bath Crayons
68. No-Sew Coloured Pencil Roll
69. Felt Fishing Set
70. Baby Flower Headband
71. Reverse Applique T-Shirt
72. Rhinestone Bracelet
73. Book Inspired Finger Puppets
74. Scrabble Coaster
75. Stuffed Turtle w/ Pattern
76. Button Print
77. Ruffle Onesie
78. Lion Stuffie
79. Easy Drawstring Bag Maybe filled with something lovely?
80. Zippered Dopp Kit
81. Monster Soap Saver
82. Monster Art Tote
83. Jelly Bean Bean Bag
84. Little Boy Tie
85. Fabric Alphabet Magnets
86. Tissue Holder
87. Embroidered Lunch Bag
88. Bunny Hat and Paw Mittens
89. Boys' Bow Tie
90. Water Bottle Carrier
91. Frame Purse
92. Gym Bag
93. Pillow Fight Shield
94. Tee Pillow
95. Felt Slippers
96. Girls' Tutu
97. Felt Board
98. Popsicle Soap
99. Monster Mittens
100. Hair Straighteners Pouch


Adele x

Sunday, October 30, 2011

Candied Pecans in a Jar Tutorial

Hi everyone! It's Christine, again, from What's Up, Cupcake? Blog.  I just wanted to share another tutorial with you - this time for one of my all-time favorite, holiday giveaway treats.  


This recipe is great for any time of year, but I always end up making them for the holidays.  They're so easy to package and distribute that it just makes sense to make them for the holidays. They are the perfect, jar-friendly, easy-to-make, edible gift. Oh, and they're soooo yummy!  Really, I promise.  I made a batch for work and everyone was asking for the recipe.  Make them - you won't regret it.


I used the same jars as my cupcakes-in-a-jar.  Small, 8oz, canning jars.  You can buy these online, at many grocery stores (in the baking or canning section), and some craft stores.  I picked up a flat of a dozen for $8 at Wal-mart.

Sugar and Spice Pecans
Recipe from a friend

Ingredients:
1 lb pecans (4 cups)
1/2 cup sugar
2 1/2 tbsp corn oil
1 tbsp vanilla

Spice Mix (Combine to coat the nuts after baking):
1/2 tsp salt
1/4 tsp pepper
1/4 tsp coriander
1/4 tsp cinnamon
1/4 tsp nutmeg
1/4 tsp all-spice

Preheat oven to 350 degrees.

Boil water.  Add pecans and cook for 1 minute, stirring.  Drain pecans and put in medium bowl.  Add the corn oil and vanilla, stirring until the pecans are coated.  Add sugar and stir to coat.  Spread pecans in a single layer on a baking sheet.


Bake pecans for 30 minutes, stirring occasionally to ensure they don't stick or burn.  I stir a minimum of once every 10 minutes.

After 30 minutes, remove nuts from the oven and pour into a medium bowl.  Sprinkle with the spice mix, then stir to coat.  Let cool.


Once the pecans are cooled, you can add them to the jars.  You can fill 5 - 8oz. jars with one batch.  If you have any extras, I love to throw them in a bag, and store in the freezer.  These are delicious at room temperature, but I absolutely love them frozen.


Decorating:
You can decorate these how you like. I did two different options.

1. Wrap a band of ribbon around the top of the lid.  I attached this with double-sided scrapbooking dots.

2. Cut out a piece of fabric (this is perfect for fabric scraps you may have!) a little larger than the lid.  Tie a piece of ribbon, twine or raffia around the lid to hold in place.


If you don't have canning jars, fill plastic bags and tie with ribbon.

Decorations

Here's some felt decorations I've been making today.  I've used cookie cutters as templates and then either stuffed them or sewn on extras as decoration.  I've stitched round the outside of each decoration with embroidery floss as don't like trying to turn felt right side out as don't find the results very good and like using the embroidery floss as an added part of the decoration of each piece.


I think my favourite has to be the sequinned flamingo, not very Christmassy I know but it's fun!

My Crafty Christmas plans

Hi, I'm Helen from Josie and May. This is my first time blogging with Crafty Christmas Club (thanks Tilly for setting this up!), but I did enjoy reading all the posts last year and I've been making presents for friends and family for quite a few years now.

I''m not making too many presents this year - partly due to the amount of time left, but mostly because I'm knitting this beauty for my brother in law -

He's been pestering me for a Mark Darcy sort of Christmas jumper for years, so last year he got the pattern for his present, with the promise of a finished jumper this year. So far I've finished the back, and am up to rudolph's nose on the front.


It's not perfect. There are a few places where I've switched yarns and it's a little loose or I've not wrapped the yarns properly, but nothing that can't be sorted once I've finished. And it's hard work having four balls of yarn on the go at once.


Last year I'd planned on making some decorations, and even got as far as buying the materials, but I was channelling my energy into finishing presents so never got round to them. (Also, as I'm don't spend Christmas day itself in my flat, I never feel like I *have* to decorate - sad, I know!).

So this year I'm determined to make lots of decorations in short bursts to fill my flat with Christmas cheer. First on the list is Christmas bunting using these fabrics (from Beyond Fabrics on Columbia Road and Seamstar).


I may need more than these three fat quarters, but I'm going to see how many triangles I can get from them before I start buying more!

And no home is complete without a wreath. I fell in love with this ribbon wreath when I spotted it last year.
http://thelongthread.com
This all black one is for Halloween, but I bought green, red and gold satin ribbon from a market stall last year (I'm hoping I don't regret not getting grossgrain ribbon, but the amount needed would cost more than I was comfortable spending). Rather than buy a foam wreath I got some wire, so I may need to pad that out a bit before I start tying the ribbon.


But then this year I spotted this on Pinterest. So if I can find the foam wreath then I'm hoping to make this one too. What? More Christmas wreaths than bedrooms is totally ok, no?


I will be making a few make up bags using Flossie Teacake's excellent pattern for presents for friends and family. Best £3.50 I've spent on a pattern - I've made so many of these!

Slouchy make up bag

I've been planning on giving my Mum this shawl from a Rowan book for, oooh, probably 5 years. That's how long I've had the book and the yarn (Sirdar Wash and Wear double crepe dk). But it took me a long time to get my head round the lace pattern, and now that I have the brother in law's jumper is getting in the way! Hopefully this will be ready in time, but if not it'll make a lovely Mothers Day present.
Kashmir Shawl in Rowan classic alpaca (book 13)
Source: www.englishyarns.co.uk
So that's the crafting sorted, and I haven't even thought about baking! I'm organising and taking part in a Christmas bake-off at work, so any suggestions of Christmas themed goodness kindly accepted!

Getting the Limoncello Started...


With less than two months to go before Christmas, it's time to get the limoncello going. I'm following this recipe. So far the process has involved peeling the rind off some lemons and sticking it in jars with vodka. Now I have to wait. And turn the mixture every so often. Some recipes say to do this for a week, others a month, before adding sugar syrup and waiting some more. Let's see how long I last!


This is what it looks like at the moment. I'll show you what it looks like in a few weeks' time...

Love from Tilly

THE GREAT NOVEMBER FABRIC EXCURSION 19th NOVEMBER

Image from Here

I am in need of supplies for my Christmas present making and I am running a trip from my blog for anyone who wants to meetup and have a good day out in London.

It has been decided! On the 19th of November I will be standing at Goldhawk Road Tube Station waiting like a teenager on a first date for lots of lovely ladies to come and join me for a fabric shopping extravaganza!

Bring your pocket money!

If you can leave your emails in the comment box or on my blog.
so I know who is coming that would be fantastic! I will then email any further details!

Hope you can all make it!

Saturday, October 29, 2011

Free Printable - "November 2011 Calendar" for Christmas TV Schedule!

This is our first Free Printable... a November Calendar so you can print and mark your favorite upcoming Christmas Movies... Old and New, of course!!! It's perfect for printing and posting on the fridge, desk area, or sharing with a friend! ( hint! hint! )

here's a "Sneak Peek" Small image of it:


To print, Click on this Link for Enlarged Picture:

http://i774.photobucket.com/albums/yy29/

Friday, October 28, 2011

Sun hat

While those of you in the northern hemisphere are busy knitting up mittens and scarves, those of us down south are thinking about summery gifts - like good old sun hats!  This one is actually a birthday gift for an outdoorsy friend, made using a pattern from Lotta Jansdotter's Simple Sewing book.  It was very easy and quick to create and didn't use much fabric. The hat has rows of stitches around the brim which helps to keep it sturdy, and has a contrasting fabric for lining.

I also need to share with you all that Pip Lincolne, Australian's Queen of Craft, has just posted a list of 307 handmade gift tutorials on her blog, Meet Me At Mikes.  Can you believe it?  I'm still working my way through the list, but there is endless crafty ideas to be found there (and Pip's tutorials for crocheting, if you wanted to learn).

Stitchybritt x

World Series Baseball + Favorite Baseball Movies

Well, if you saw my post yesterday, then you read that I was cheering for the Texas Rangers to win the World Series Baseball Game last night. (game 6) I stayed with it... all the way into 11 (edge of my seat!) innings.... and they unfortunately, lost. With the games tied up 3-3 - it's any body's ball game now - and I'll be cheering on the Rangers tonight! (October 28, 2011)


*Inspired by the

Cuben Fiber Bags


Hello you all! I am bit late in introducing myself : I am CarmencitaB, I blog, tweet and FB under the same name and I make my gifts which you saw here last year.
Those who know me know I am quite the procrastinator and I usually make the same gifts for everyone so I am gearing up to use some Cuben Fiber sailcloth Mr C brought me for recycling purposes and some thrifted polyester check. I made some mock ups last weekend and some more ideas are bubbling up under the hood which I'll be exposing here. I think a zippered version of the small bag on the right would make an excellent travel make up toileteries thingy bob pouch that my nieces could use as a handbag. Now I have to think up what 'll be doing for the boys.

Thursday, October 27, 2011

Misty Monday Morning Kit ~ mittens & cowl knitting pattern

Hello again Christmas Crafters!  Greetings from Stitch me Softly...

Herewith a super easy and lightning quick knitting pattern - a winter warmer kit complete with mittens and matching cowl...  I had every intention to give this first set away as a gift, but since trying it on, no way jose!!  I am sooooo keeping it!  


Luckily though, for the other ladies I will be Christmassing with, this kit knits up so fast with Debbie Bliss' delicious Como yarn, which has been discontinued so you can get it for pretty cheap on ebay, so I'm sure I'll be churning out a few more!


So as not to take up acres of precious screen space with lines and lines of k2 p2 k2tog...knitting morse code blah blah blah, please see this post from my blog for the pattern.

Happy knitting!

It's the Great Pumpkin, Charlie Brown!


It's that time of year, again! Don't Miss it!


The Annual Special - It's the Great Pumpkin, Charlie Brown, airs Tonight - October 27, 2011 - on ABC at 8 PM est.

(Yes, I know, "Oh, Good Grief"... it airs opposite of Baseball - the World Series Game 6 on Fox! ((Go Texas Rangers!)) If you just can't turn the game, You can also download it online and watch it on instant video!

I don't typically

Wednesday, October 26, 2011

A Slightly More Organised Gift List

So after my very rough and ready ideas post a few weeks ago, i have now come up with a much more organised list! Quite possibly prompted by the only-2-months-to-go fear, I sat down today and wrote a list of the people i am planning to give gifts to this year, and worked out what i hope to make/buy for them. I realise that this kind of organised approach is probably the usual one for most people, but it helped me so much to have everything written down properly on paper rather than an abstract list in my head. Before the task of making any presents seemed so overwhelming that i was a little confused about where to start, but now i have a much better idea. Ahhh, Zen!

So my current list (which may change again as i realise how realistic it may or may not be) is:

- Knitting needle roll for my mum, probably based on Wendy's very helpful tutorial

- 2 or 3 scarfs, for the men-folk (Dad, Brother, Boyfriend)...as many have lamented on here, men are notoriously hard to craft for. I figure i can't go wrong with scarfs, right? I'm thinking a basic rib idea, i did see a pattern somewhere but if it doesn't turn up not the end of the world as i have a pretty good idea of how i would like them to look.

- A washbag for my Nana, probably a larger version of this little bag i made previously...

 ...only with some kind of waterproofed fabric/lining if i can figure out where to get this from!


- For some little people i know (both under 6 months) i am thinking baby quilts and perhaps also a patchwork toy as i fell in love with this one, both based on Cath Kidston patterns. I have this fabric for the quilts which i love, I'll probably mix it with pale blue polka dots.


- For another little person i need ideas...he is 2 yrs old so i think perhaps a bit old for a quilt? Any input welcome!

- Also a (somewhat manly!) apron for my boyfriend, who loves to cook

- For my two or three of my best friends i am thinking perhaps bags...something along the lines of a simple over-the-shoulder messenger bag. I have not looked at patterns yet so any ideas welcome :)

- A couple of small makes for crafty friends...i thought perhaps pin cushions or something along these lines

- For other friends, my boyfriends family and also probably for my family i would like to make some sweet treats. I love the idea of making Lebkuchen but I'm a little bit concerned that these might go off after a day or two, so i am also looking to make some goodies that will last for a few days so that i don't have to make them immediately before giving. I'm currently thinking fudge...flavours i am drawn to include Cherry and Coconut, Rum and Raisin, and how could i possibly resist the sound of Baileys and White Chocolate?

So that's that's the list! At the weekend i went on a course where i learnt to applique. I absolutely love my newest skill, as i think there are so many options for adding personal and unique touches. So expect to see this technique cropping up all over my Christmas makes!

That's all for now...hopefully the next time i post i will be able to report some progress on this rather long list...!

K xx

Snips and SNAILS!!

Hello, my name is Jennifer and my blog is Ohio Is My Dwelling Place.  Lately it's been all about birds...mostly owls.  I found the pattern for these cuties in an ancient magazine in the library archives, "Create & Decorate".  They were shown as shabby-chic in pastel floral, but I changed it up entirely and tried to make them in realistic owl colors.  I've also changed the stuffing from cotton batting to cedar chips (the kind used in dog beds!) and ta-da.........Closet Owls.
  I'm sure most of you have heard of Barn Owls, but these little guys "nest" in the dark recesses of one's closet and freshen the air with their cedar-chip filling.  I've given one to my mother already as an Autumn gift and suddenly I find myself with orders for 16 more!  Not a problem though, as I love owls.  Then my BFF from school called me with a request for SNAILS.  Yes, they are cute but I never imagined a school (her daughter's school to be specific) would use a snail as it's mascot.  "Go, Go Escargot!" is their school cheer.  So I scoured the Internet for freebie amigurumi patterns of snails and found this guy.  I don't know if I can part with him though.............those eyes! Now it's off to find some small cross-stitch motifs, a bit of polymer clay and maybe some beads and glitter to continue the snail-themed items.  All this must be completed and mailed off to my friend for the school's Christmas Bazaar in TWO WEEK!  No snail's pace for me.........................

Travel card tutorial

Hello again (guess who is enjoying a lazy half-term day?!)

After seeing how much Wendy has made already, I realised I needed to get making myself. I am going to make these for my brother, 2 cousins and my dad (maybe for friends) to keep their oyster cards and train tickets in.

You will need:
Small pieces of fabric
See-through plastic (old packaging or shower curtain-style plastic)
Bias binding
Sewing machine and thread

First make your pattern. For the main pattern I drew around 2 tickets on a piece of paper, with at least 0.5cm gap around (final measurement was 7.5cm by 21cm). For the pockets I drew a rectangle slightly bigger than a ticket (7.5cm by 9.5cm)


Next cut out fabric. Last time I made this I used a pvc covered fabric, but when I looked for remnants in John Lewis they had a transparent plastic so I am using this and regular fabric.
You will need a cover and lining cut from the big rectangle, and 2 pieces of plastic cut from the small rectangle.

Baste the lining and cover together (and transparent plastic if you are using it). You will need to sew slowly and help the plastic through carefully. I am ignoring the knots in the corner as they will be covered by the binding later.

Sew a strip of binding onto each plastic pocket. I pinned the binding next to the plastic to hold it in position. Depending on the plastic you are using, you may need to use a strong needle (I used leather needle last time, but didn't need anything for this plastic)

Lay the two pockets on the lining and attach the binding around the edge. When you've sewn the first side of the binding, round off the plastic corners, then finish the binding.


Voila! A travel card case. Now to make some novelty tickets (and railcard) to go inside..